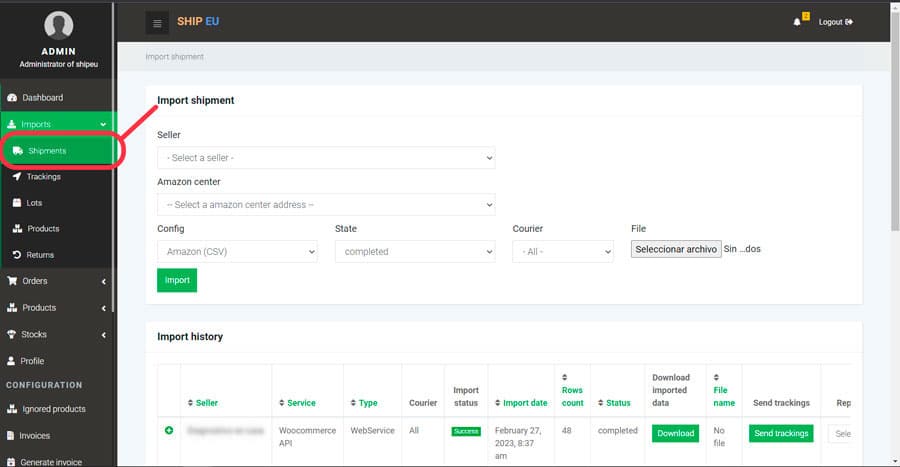
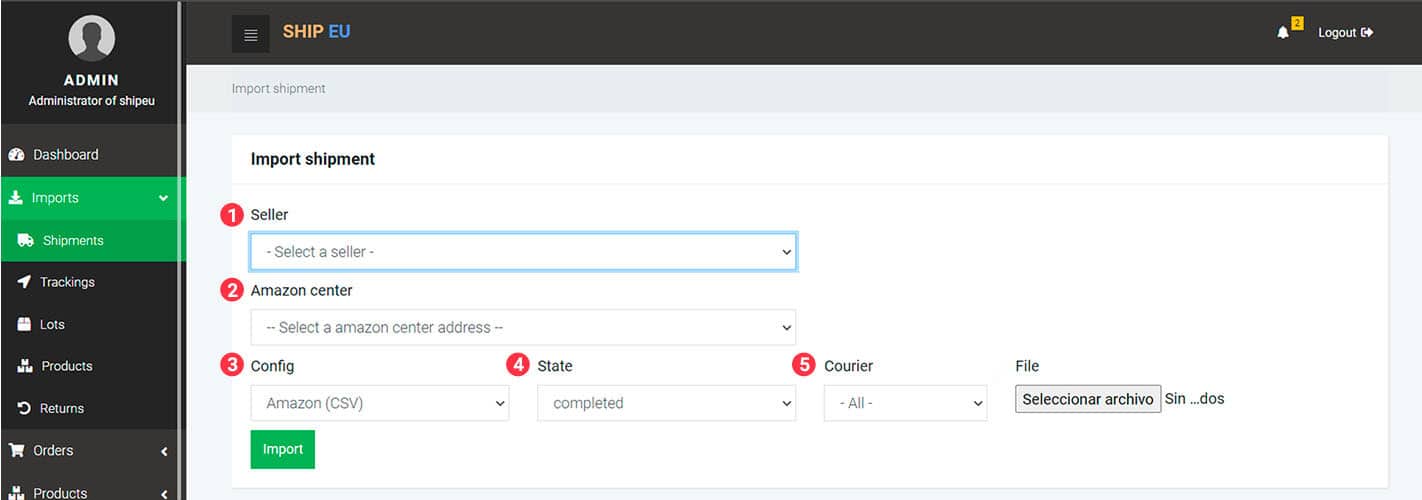
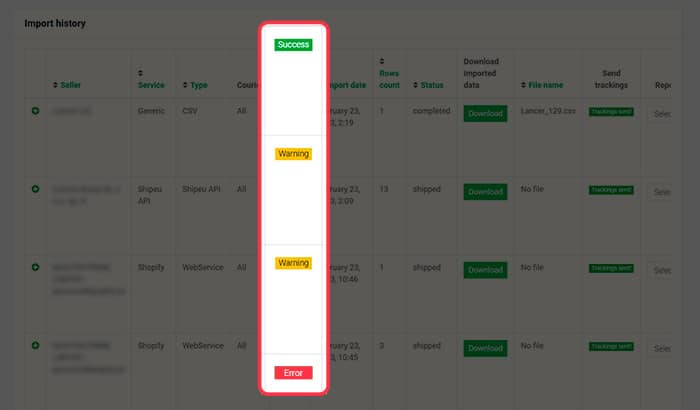
Home / Guide Shipeu / Imports
You can access the Imports section by clicking the option under the Dashboard from the sidebar men
This section consists of the following items: Shipments, Trackings, Lots, Products and Returns.
To access this item you must go to the sidebar menu and select the Shipments item under Imports section.
Here, you will find a form to import a shipment. To do so, you have the following options:
Seller: Select the company responsible for sales in your business
Amazon Center: Select the Amazon Center location
Config:
In the Config option you must select the way by which the orders will be imported. This can be through a WebService, through a CSV file, generic file or manually.
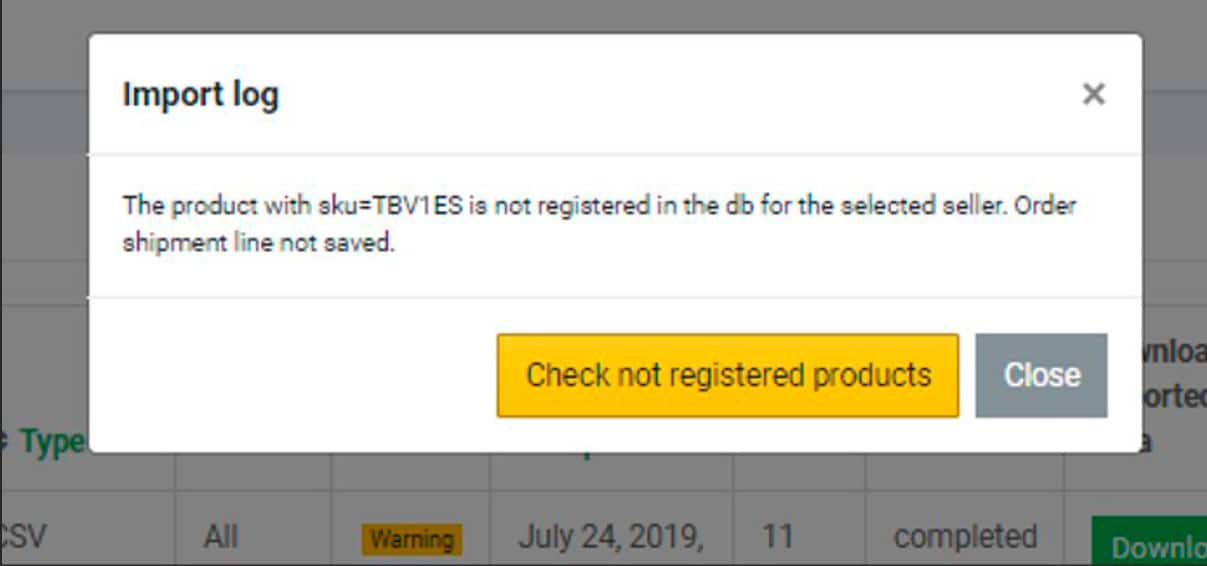
If you select a WebService, Shipeu will bring all orders that have not been imported since the last time.
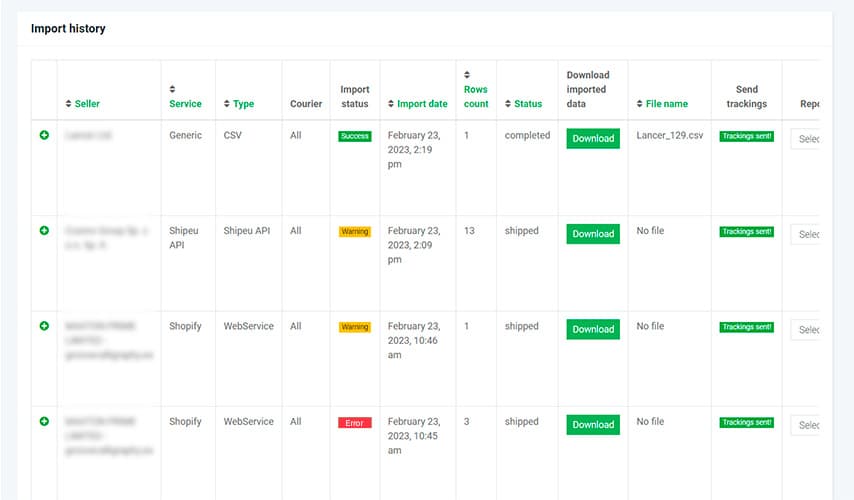
The web services currently available to connect with Shipeu are:
Shopify | Woocomerce | Mirakl | Amazon | Magento | Open Cart | Wish | Prestashop
Every column of the CSV must be separated by a semicolon. If you need to leave a column empty, you can, but you must add the semicolon after the empty space, like in the example above with the column shipping_address_2 which has no data.
In the last column “line_items” you can specify the amount of products for each order, to do this, you must go to the line_items column and in there you will indicate the next format (as long as you need to add more than one product):
When you click this button you will be directed to the New order shipment form. To refer this form click here.If the order was successfully created, the shipment you just created will appear in the table:
Now that the config part is ready, you can continue to the next step (if you selected Manual register, this is all, if not, you must continue to the part 4) to import the shipment.
In the State option you must select the status of the shipment that will be downloaded.
In the last one you must select the Courier. If you select “All” then no filter will be applied for the courier. If you select another option, then all the orders will be downloaded (so the system can classify them) but only those that match the filter will remain.
Finally, you have to click on the Import button.
In the Import history table, which is below the form, you will see the history of all imported shipments of the seller
with their respective information.
In the Import status column you will be able to see the import status which can be Success, Warning or Error.
When the status is different from Success, you can click on the Warning or Error button and it will display a window with the information about the problem.
If the problem is that a product is not registered, then you must click on the Check not registered products button which will take you to a form to register the product.
Other problems may also occur, such as incorrect structure of the information returned by the Webservice,
problems with downloading the orders, and so on.
1. In the Imported data column, you have the option to download the previously uploaded file by the user.
2. Once the orders have their respective tracking code and if the import status is successful, you must click
on the Confirm shipment
3. In the column Report type you can select the type of report you want to download.
4. The column Download trackings allows you to get a file with the trackings of the selected shipment.
If you click in any row of the table you will see all the orders of that shipment:
Here, you can see the information about the shipment orders, such as the order id, shipped date, client name, country, the tracking code, shipped and payment method and service code which refers to the code for the courier. If an agreement was not reached with SpainBOX about a specific courier, the system has an internal configuration which will assign a courier according to the characteristics of the order.
Now, to see the details of every order, you can click in any order and it will display its information.
This will show some information such as the SKU of every product, the name and the amount of units of each
product.
Once the shipment orders have been downloaded, the seller will be notified that these shipping orders were processed and sent to the different courier services.
After this, a tracking code for every order will be generated. This code indicates that the shipment was effectively done.
Now, to assign every other its respective tracking code there are different ways you can make it:
In the shipments form you must:
Indicate the order id
Click on the check button
If the table shows a result for the given order id, go to the respective row and click on the edit button.
You will be directed to the Update order shipment form. In here, you must search for the “Tracking” field and indicate the given tracking.
The shipped date will be automatically filled when the shipment is sent. However, this date can be modified if necessary. The tracking sent date will be later automatically filled when the tracking is sent.
To finish, click on the Save shipment button. Now, the order will have its respective tracking code.
The other way to fill the trackings is by the Trackings item inside the Imports option from the sidebar menu. Click here to see this procedure.
Now that the orders finally have their tracking, you will be able to send them.
In the table you must look for the send trackings column and there, see the Send trackings button for the shipment order. Click on this button and it will send all the orders of the selected row, which have a tracking code to the Webservice that the seller has configured. This action will change the state of the shipment, from completed to shipped.
Once the trackings are sent, in the Send trackings column, the send trackings button will change to Tracking sent. Click on this button to display a window with a summary of the trackings.
The status can be sent or can be error. Click on the Send trackings again if necessary.
The other way to fill the orders with the trackings, is by going to the Trackings page. Click here to see this procedure.
To go to the Trackings item you must go to the sidebar menu and select the trackings option inside the Imports section.
Here, you will be able to import a tracking file, so you do not have to make it manually.
When the orders are ready to be sent, SpainBOX delivers the products with their corresponding order id to the courier. The courier must generate a tracking code for every order and send a file with this information.
Now, this file is ready to be imported. To do so, you must:
Shipeu will process this information and bring an import status, which you can see in the table in the Import status column.
In the table below the form you will see the history of all imported trackings.
In there, you will see some information such as the import, start and end date, the number of orders of every shipment, the total ship price, the sam report type, the status of the import which could be Success, Warning or Error. If the status is different from Success, you can click on the Warning or Error button.
This will display a window with the information of the problem.
If the import status is Success, it means that there was no problem with the orders and they are ready to be updated with their respective tracking code. To do so, you must click on the Update trackings. This action will automatically update all the corresponding orders giving them their tracking number.
In the download shipconfirm column you have the option to download the file with the order-id and tracking of the orders.
In the next column, download imported file, you can download the data you previously uploaded.
Finally, in the last column you will have the option to delete any file you select.
To see the list of products imported by the seller you must go to the sidebar menu and select the Products item that is inside Imports item.
In this section you will be able to import a file with products. To do so, you must click on Seleccionar
archivo button and then select a file which has to be in CSV or TXT format.
This file must contain at least the columns sku, name and barcode and must be separated by one pipe (|). E.g.:
The available columns for the data of the product are showed in the table below
Improve your warehouse efficiency and satisfy your customers with our picking services and our included wms SHIPEU.
Contact us now for personalized and efficient service! We take care of your warehousing and distribution operations so you can focus on growing your business.
Fulfillment for
E-commerce Business
GUIDE SHIPEU – IMPORTS